
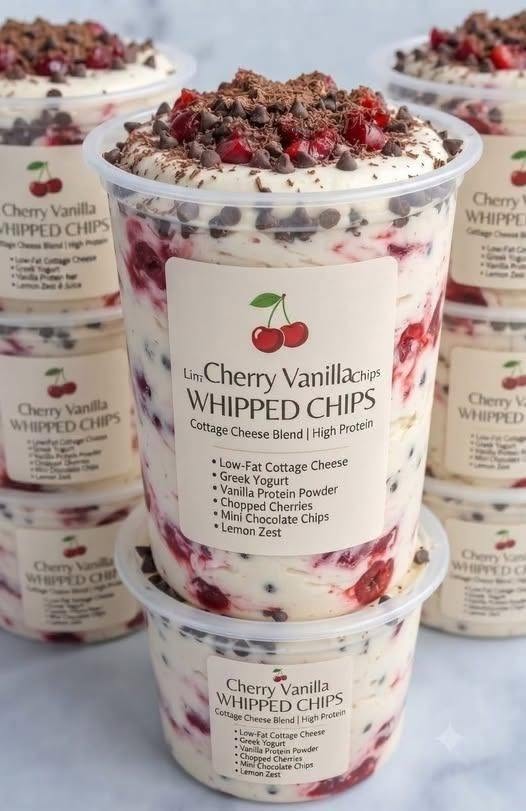
High-Protein Cherry Vanilla Whipped Cottage Cheese Cups – Creamy, Healthy & Delicious No-Bake Dessert
Description
High-Protein Cherry Vanilla Whipped Cottage Cheese Cups are a delicious, creamy, and refreshing no-bake dessert made with protein-rich cottage cheese, sweet cherries, vanilla extract, and a touch of natural sweetness. These beautiful dessert cups combine the smooth texture of whipped cheesecake filling with the fresh, fruity flavor of juicy cherries.
The secret to this recipe is blending cottage cheese until it becomes incredibly smooth, light, and creamy. Once whipped, cottage cheese transforms into a velvety dessert base that tastes wonderfully rich without requiring heavy cream or cream cheese.
Fresh or frozen cherries add natural sweetness, vibrant color, and a delicious fruity flavor. A little honey or maple syrup balances the tanginess of the cottage cheese, while pure vanilla extract creates a comforting, dessert-like aroma.
These high-protein dessert cups are perfect for breakfast, afternoon snacks, post-workout treats, meal preparation, or a lighter dessert after dinner.
Unlike traditional cheesecake desserts, this recipe requires no baking, no complicated preparation, and only a handful of everyday ingredients.
Serve the creamy vanilla cottage cheese mixture in small glass cups, topped with juicy cherries, a spoonful of cherry sauce, and optional crushed nuts or granola.
Whether you’re looking for a satisfying high-protein snack or a beautiful homemade dessert, these cherry vanilla whipped cottage cheese cups are an excellent choice.
Prep Time: 15 minutes | Cook Time: 5–7 minutes (optional cherry topping) | Chilling Time: 30 minutes | Total Time: Approximately 50 minutes | Servings: 4
Ingredients For the Whipped Cottage Cheese Base
-
2 cups cottage cheese, preferably 2% or 4% milkfat
-
½ cup plain Greek yogurt
-
2 tablespoons honey or pure maple syrup
-
1½ teaspoons pure vanilla extract
-
1 teaspoon fresh lemon juice
-
¼ teaspoon finely grated lemon zest (optional)
-
1–2 tablespoons milk, only if needed for blending
For the Cherry Topping
-
1½ cups fresh or frozen cherries, pitted
-
1 tablespoon honey or maple syrup
-
1 teaspoon fresh lemon juice
-
2 tablespoons water
-
½ teaspoon vanilla extract
For Garnishing
-
¼ cup fresh cherries, halved
-
2 tablespoons chopped almonds or pistachios
-
2 tablespoons granola (optional)
-
Fresh mint leaves
-
A light sprinkle of cinnamon (optional)
Step-by-Step Instructions
Step 1: Prepare the Ingredients
Gather all the ingredients before beginning.
If using fresh cherries, wash them thoroughly, remove the stems, and carefully remove the pits.
If using frozen cherries, they can be added directly to the saucepan without thawing.
Measure the cottage cheese, Greek yogurt, honey, vanilla extract, and lemon juice.
For the smoothest texture, use a high-speed blender or food processor.
Step 2: Prepare the Cottage Cheese
Add the cottage cheese to the blender or food processor.
Blend for approximately 30–60 seconds until the large curds begin breaking down.
Scrape down the sides of the blender using a silicone spatula.
Continue blending until the mixture becomes smoother.
This step is important because it transforms traditional cottage cheese into a creamy dessert base.
Step 3: Add the Greek Yogurt
Add the plain Greek yogurt to the blended cottage cheese.
Blend again until thoroughly combined.
Greek yogurt adds extra protein, creaminess, and a slight tanginess that complements the sweet cherry topping.
The mixture should become thick, smooth, and fluffy.
Step 4: Add the Vanilla and Sweetener
Pour in the honey or maple syrup.
Add pure vanilla extract, lemon juice, and optional lemon zest.
Blend for another 30–45 seconds.
Taste the mixture and adjust the sweetness if necessary.
If the mixture is too thick to blend smoothly, add milk one tablespoon at a time.
Avoid adding too much liquid because the dessert should remain thick enough to hold its shape in serving cups.
Step 5: Whip Until Creamy
Continue blending until the cottage cheese mixture becomes completely smooth and velvety.
The finished texture should resemble a thick cheesecake mousse.
There should be no noticeable cottage cheese curds.
Transfer the whipped mixture to a bowl and refrigerate while preparing the cherries.
Step 6: Prepare the Cherry Topping
Place the pitted cherries in a small saucepan.
Add honey, lemon juice, water, and vanilla extract.
Stir gently to combine.
Heat over medium-low heat until the cherries begin releasing their natural juices.
Step 7: Simmer the Cherries
Allow the cherry mixture to simmer gently for approximately 5–7 minutes.
Stir occasionally to prevent sticking.
The cherries should soften slightly while maintaining some of their shape.
Use the back of a spoon to gently mash a few cherries if you prefer a thicker, more jam-like topping.
For a fresher variation, skip cooking and simply toss chopped fresh cherries with lemon juice and a little honey.
Step 8: Cool the Cherry Mixture
Remove the saucepan from the heat.
Allow the cherry topping to cool completely.
Do not pour hot cherries directly over the whipped cottage cheese because the heat can soften the creamy mixture.
For faster cooling, transfer the cherries to a shallow bowl and refrigerate briefly.
Step 9: Prepare the Serving Cups
Arrange four small glass dessert cups or jars on a clean countertop.
Spoon approximately one-quarter of the whipped cottage cheese mixture into each cup.
Use the back of a spoon to smooth the surface.
For an elegant presentation, transfer the mixture into a piping bag and pipe it into the cups.
Step 10: Add the Cherry Layer
Spoon the cooled cherry topping over the whipped cottage cheese.
Distribute the cherries evenly among the four cups.
Allow a little cherry syrup to drip naturally over the creamy vanilla base.
The contrast between the white whipped cottage cheese and deep red cherries creates a beautiful dessert presentation.
Step 11: Add the Garnishes
Top each cup with fresh cherry halves.
Sprinkle with chopped almonds, pistachios, or a small amount of granola.
Add a fresh mint leaf for a bright finishing touch.
For the best crunchy texture, add granola immediately before serving.
Step 12: Chill Before Serving
Cover the dessert cups and refrigerate for approximately 30 minutes.
Chilling helps the whipped cottage cheese mixture firm up slightly and allows the vanilla and cherry flavors to develop.
These cups can also be enjoyed immediately if you prefer a softer consistency.
Step 13: Serve and Enjoy
Remove the dessert cups from the refrigerator.
Serve chilled with a small dessert spoon.
Enjoy the creamy vanilla cottage cheese, juicy cherries, and optional crunchy toppings in every delicious bite.
Tips and Notes
1. Use Good-Quality Cottage Cheese: Choose a mild-flavored cottage cheese for the smoothest, most delicious dessert.
2. Blend Thoroughly: Blending is essential for creating a creamy texture without noticeable curds.
3. Choose 2% or 4% Cottage Cheese: These varieties generally produce a richer, creamier result than fat-free cottage cheese.
4. Use Plain Greek Yogurt: Greek yogurt adds creaminess and protein without making the dessert overly sweet.
5. Adjust the Sweetness: Add more or less honey depending on the natural sweetness of the cherries.
6. Use Fresh or Frozen Cherries: Both work beautifully. Frozen cherries may require slightly longer cooking.
7. Remove Cherry Pits Carefully: Always check that all pits have been removed before preparing the topping.
8. Avoid Excess Liquid: Add milk only if needed to help the cottage cheese blend smoothly.
9. Let the Cherries Cool: Hot cherry topping can soften the whipped cottage cheese mixture.
10. Add Lemon Juice: A little lemon juice brightens the flavor and balances the sweetness.
11. Make It Ahead: Prepare the cups several hours before serving and refrigerate until needed.
12. Add Crunchy Toppings Last: Granola and nuts taste best when added just before serving.
13. Make It Sweeter: Add a little extra maple syrup or honey for a more dessert-like flavor.
14. Try Different Fruits: Blueberries, strawberries, raspberries, or peaches make delicious alternatives.
15. Storage: Store covered dessert cups in the refrigerator for up to 3 days.
16. Freezing: Freezing is not recommended for the best mousse-like texture because the mixture may become grainy after thawing.
Frequently Asked Questions
1. Can You Really Make Dessert with Cottage Cheese?
Yes! When blended thoroughly, cottage cheese becomes incredibly smooth and creamy. Its mild flavor makes it an excellent base for high-protein desserts.
2. Does Whipped Cottage Cheese Taste Like Cheesecake?
It has a creamy, slightly tangy flavor similar to cheesecake filling, especially when combined with Greek yogurt, vanilla, and a sweet fruit topping.
3. Can I Make This Recipe Without Greek Yogurt?
Yes. Replace the Greek yogurt with additional cottage cheese. The dessert will still be creamy and protein-rich.
4. Can I Use Frozen Cherries?
Absolutely. Frozen cherries are convenient and work especially well for the cooked cherry topping.
5. Can I Make These Dessert Cups Without Honey?
Yes. Maple syrup, date syrup, or another preferred sweetener can be used instead.
6. Can I Use Low-Fat Cottage Cheese?
Yes. Low-fat cottage cheese works well, although the final mixture may be slightly less rich.
7. How Do I Make the Cottage Cheese Completely Smooth?
Use a high-speed blender or food processor and blend until the mixture becomes silky. Scrape down the sides as needed.
8. Can I Add Protein Powder?
Yes. Add 1–2 tablespoons of vanilla protein powder if desired. You may need a splash of milk to maintain a smooth texture.
9. Can I Prepare These Cups the Night Before?
Yes. Assemble the dessert cups, cover them, and refrigerate overnight. Add crunchy toppings just before serving.
10. Are These Cups Suitable for Meal Prep?
Yes. Divide the whipped cottage cheese and cherry topping into individual airtight containers for convenient snacks throughout the next few days.
11. Can I Use Other Fruits Instead of Cherries?
Absolutely. Strawberries, raspberries, blueberries, mangoes, or peaches are delicious alternatives.
12. How Long Do These Dessert Cups Last in the Refrigerator?
They are best enjoyed within 3 days when stored covered in the refrigerator at 40°F (4°C) or below.
Servings and Nutrition
Preparation Time: 15 minutes
Cooking Time: 5–7 minutes
Chilling Time: 30 minutes
Total Time: Approximately 50 minutes
Servings: 4
Serving Size: 1 dessert cup
Estimated Nutritional Information Per Serving
| Nutrient | Approximate Amount |
|---|---|
| Calories | 220–260 kcal |
| Protein | 17–21 g |
| Carbohydrates | 25–31 g |
| Fat | 5–8 g |
| Saturated Fat | 2–4 g |
| Fiber | 1–2 g |
| Sugar | 20–25 g |
| Sodium | 350–450 mg |
| Calcium | 120–180 mg |
Nutrition values are estimates and depend on the cottage cheese, Greek yogurt, sweetener, cherry quantity, and optional toppings.
Why You’ll Love This Recipe
High-Protein Cherry Vanilla Whipped Cottage Cheese Cups are the perfect combination of creamy texture, refreshing fruit flavor, and simple homemade preparation.
The whipped cottage cheese creates a smooth, cheesecake-like base, while Greek yogurt adds extra protein and a delicious tangy flavor.
The juicy cherry topping provides natural fruit sweetness and a beautiful contrast to the creamy vanilla mixture.
These dessert cups require no baking, can be prepared ahead of time, and look beautiful served in small glass jars.
They’re perfect for breakfast, afternoon snacks, meal preparation, or a lighter dessert after dinner.
Creamy vanilla whipped cottage cheese layered with juicy cherries and finished with delicious crunchy toppings—these easy high-protein dessert cups are a refreshing homemade treat you’ll want to make again and again! 🍒🥣❤️