
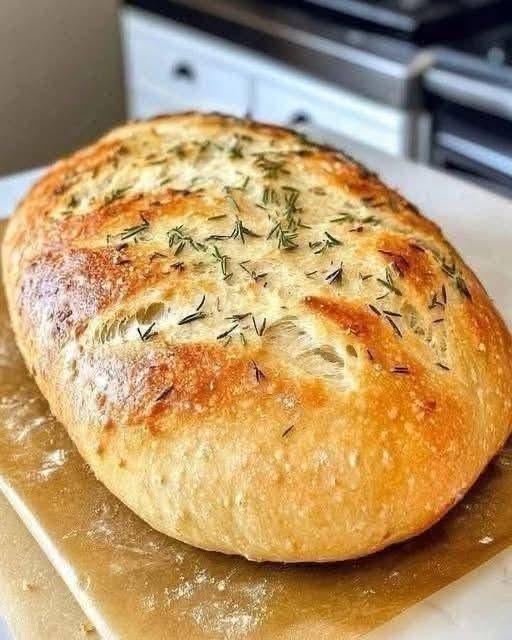
Rustic No-Knead Herb Bread 🍞🌿
This rustic no-knead herb bread has a crispy, golden crust with a soft, airy center and a delicious hint of herbs in every bite. It’s incredibly easy to make with just a few pantry ingredients and requires very little hands-on work. Perfect for serving with soups, pasta, sandwiches, or simply toasted with butter.
Preparation Time
- Prep Time: 10 minutes
- Rise Time: 12–18 hours
- Second Rise: 30–45 minutes
- Bake Time: 40–45 minutes
- Total Time: About 14–19 hours
Servings: 8–10 slices
Ingredients
For the Dough
- 3 cups (375g) all-purpose flour or bread flour
- 1½ teaspoons salt
- ½ teaspoon instant yeast
- 1½ cups (360ml) warm water
For the Topping
- 1 tablespoon fresh rosemary or thyme
- 1 tablespoon olive oil (optional)
- Extra flour for dusting
Instructions
Step 1: Mix the Dough
In a large mixing bowl, combine the flour, salt, and instant yeast. Pour in the warm water and stir with a wooden spoon until a shaggy, sticky dough forms. There’s no need to knead—the dough should look rough and sticky.
Step 2: First Rise
Cover the bowl tightly with plastic wrap or a clean kitchen towel. Let the dough rise at room temperature for 12–18 hours. By morning, it should be bubbly, doubled in size, and full of air pockets.
Step 3: Shape the Dough
Lightly flour your work surface and gently turn out the dough. Fold the edges toward the center a few times to form a rough round or oval loaf. Avoid pressing out the air bubbles.
Place the dough on a sheet of parchment paper dusted with flour.
Step 4: Second Rise
Cover loosely with a towel and allow the dough to rest for 30–45 minutes.
Meanwhile, preheat your oven to 450°F (230°C) with a Dutch oven (or heavy oven-safe pot with lid) inside for at least 30 minutes.
Step 5: Add Herbs
Brush the top lightly with olive oil if desired and sprinkle generously with fresh rosemary or thyme.
Use a sharp knife or bread lame to score the top with a few shallow cuts.
Step 6: Bake
Carefully remove the hot Dutch oven.
Lift the parchment paper and dough together into the pot.
Cover with the lid and bake for 30 minutes.
Remove the lid and continue baking for another 10–15 minutes, until the crust is deeply golden brown and crisp.
Step 7: Cool
Transfer the bread to a cooling rack and let it cool for at least 30 minutes before slicing. This allows the crumb to set properly.
Tips & Notes
- Bread flour creates a chewier texture, while all-purpose flour produces a softer crumb.
- Add roasted garlic, shredded Parmesan, or cracked black pepper for extra flavor.
- Fresh rosemary gives the strongest herb flavor, but thyme, oregano, or Italian seasoning work beautifully.
- Store in an airtight container for up to 3 days.
- Freeze sliced bread for up to 2 months and toast straight from frozen.
Frequently Asked Questions
Can I use active dry yeast?
Yes. Dissolve it in the warm water for about 5–10 minutes before mixing with the flour.
Do I need a Dutch oven?
A Dutch oven gives the best crust by trapping steam, but you can use a heavy covered casserole dish or bake on a baking stone with a pan of hot water in the oven.
Why is my dough so sticky?
No-knead dough is naturally wetter than traditional bread dough. Avoid adding too much flour.
Can I make it ahead?
Yes! After the first rise, refrigerate the dough for up to 48 hours before shaping and baking.
Nutrition (Approximate Per Slice)
- Calories: 170
- Carbohydrates: 34g
- Protein: 5g
- Fat: 1.5g
- Fiber: 1g
- Sodium: 350mg