
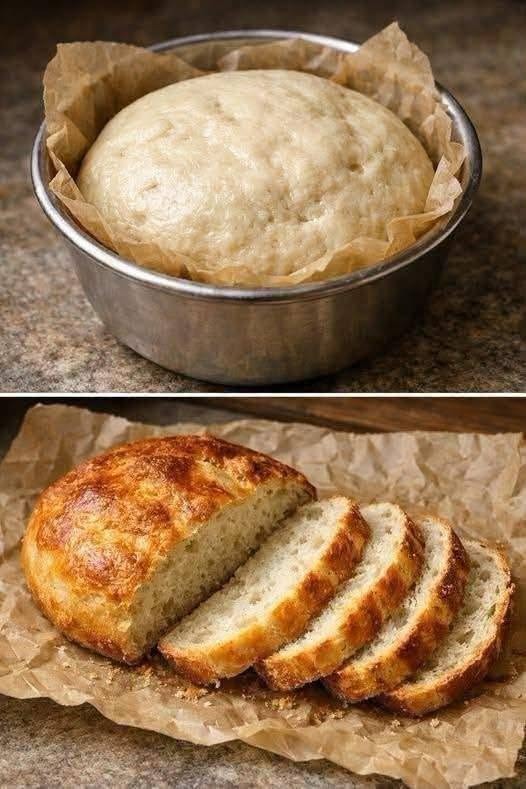
Easy No-Knead Crusty Homemade Bread
Description
If you’ve always wanted to bake homemade bread but don’t want to spend time kneading dough or using complicated equipment, this Easy No-Knead Crusty Homemade Bread is the perfect recipe to try.
With just a handful of basic ingredients—flour, yeast, salt, and water—you can create a beautiful rustic loaf with a golden, crispy crust and a soft, airy centre. The secret is time rather than effort. The dough is mixed in minutes, allowed to slowly rise, and then baked in a very hot covered pot to create a bakery-style crust.
There is no stand mixer, bread machine, or complicated kneading technique required. Simply mix the ingredients, let the dough rise, shape it gently, and bake.
This bread is wonderful alongside soups, salads, pasta, roasted vegetables, eggs, or simply sliced warm with butter.
Recipe Information
Recipe Name: Easy No-Knead Crusty Homemade Bread
Servings: 8–10 slices
Prep Time: 10 minutes
Rise Time: 8–18 hours
Cook Time: 40–45 minutes
Total Time: About 9–19 hours, mostly hands-off
Ingredients
For the Bread
- 3 cups (375 g) all-purpose flour
- 1½ teaspoons salt
- ½ teaspoon instant yeast
- 1½ cups (360 ml) lukewarm water
- 1 teaspoon honey or sugar, optional
- 1 tablespoon olive oil, optional, for a slightly softer crumb
For Dusting
- 1–2 tablespoons flour
- A little cornmeal or parchment paper, optional
Instructions
1. Mix the Dough
In a large mixing bowl, combine the flour, salt, and instant yeast.
If using honey or sugar, stir it into the lukewarm water.
Gradually pour the water into the flour mixture while stirring with a wooden spoon, spatula, or sturdy spoon.
Mix until all of the flour is moistened and you have a sticky, rough-looking dough.
Do not knead the dough.
The dough should look shaggy and somewhat wet. That’s exactly what you want.
If it looks extremely dry, add another tablespoon of water at a time. If it appears excessively wet and soupy, add a small amount of flour.
2. Cover and Let It Rise
Cover the bowl tightly with plastic wrap, a reusable cover, or a clean kitchen towel.
Leave the dough at room temperature for approximately 8–18 hours.
Overnight is ideal.
As the dough rests, the yeast slowly develops flavour and creates air bubbles throughout the dough. By the end of the rising period, the dough should look noticeably larger, bubbly, and somewhat loose.
A longer fermentation generally gives the bread a deeper, more developed flavour.
3. Prepare Your Work Surface
Lightly flour a clean work surface.
Carefully scrape the dough out of the bowl.
Because this is a high-hydration no-knead dough, it will be sticky. Avoid adding too much flour because excessive flour can make the finished bread dense.
Dust your hands lightly with flour if necessary.
4. Shape the Dough
Gently fold the edges of the dough toward the centre several times.
Turn the dough over so the seams are underneath.
Using your hands, gently shape it into a rough round loaf.
You don’t need to knead or aggressively work the dough. The goal is simply to create a reasonably smooth surface.
Place the shaped dough on a piece of parchment paper.
Cover loosely and let it rest for approximately 30–45 minutes while the oven heats.
5. Preheat the Oven and Dutch Oven
Place a Dutch oven or heavy oven-safe pot with a lid inside your oven.
Preheat the oven to 450°F (230°C).
Allow the pot to heat for at least 30 minutes.
Preheating the pot is one of the most important steps in creating that gorgeous crust.
The extremely hot surface immediately begins cooking the outside of the dough, while the covered environment traps steam.
That steam helps produce the characteristic crackly crust associated with artisan-style bread.
6. Transfer the Dough
Carefully remove the hot Dutch oven from the oven.
Using the parchment paper as a sling, gently lower the dough into the hot pot.
Be extremely careful because the pot and lid will be very hot.
If desired, use a sharp knife or bread lame to make one or two shallow cuts across the top of the dough.
These cuts allow steam to escape and give the bread an attractive rustic appearance.
Place the lid on the Dutch oven.
7. Bake Covered
Bake the bread covered for approximately 30 minutes at 450°F (230°C).
During this stage, the trapped steam helps the bread rise and keeps the crust from setting too quickly.
Don’t open the lid repeatedly because you want to retain as much steam as possible.
8. Bake Uncovered
After 30 minutes, carefully remove the lid.
Continue baking for another 10–15 minutes, or until the loaf is beautifully golden brown and deeply crusted.
For a darker crust, you can bake it for a few additional minutes.
The finished loaf should sound hollow when gently tapped on the bottom.
9. Cool Completely
Transfer the bread to a wire rack.
Allow it to cool for at least 30–60 minutes before slicing.
This step can be difficult because freshly baked bread smells incredible, but cooling allows the interior to finish setting.
Cutting the bread too early can cause the centre to become gummy.
Once cooled, slice with a serrated bread knife and enjoy!
Notes
Flour
All-purpose flour works beautifully for this recipe. Bread flour can also be used and may produce a slightly chewier texture.
Yeast
Instant yeast is convenient because it can be mixed directly with the flour.
Active dry yeast can also work. If using active dry yeast, you can dissolve it in the lukewarm water first and let it sit for about 5 minutes.
Water Temperature
The water should be lukewarm rather than hot.
Very hot water can damage the yeast.
Don’t Over-Flour
The dough is supposed to be sticky. Adding too much flour during shaping can result in a heavier loaf.
Use just enough flour to make handling manageable.
Dutch Oven
A Dutch oven is ideal because its lid traps steam around the bread. If you don’t have one, a heavy oven-safe pot with a secure lid can work.
Make sure the pot and lid are rated for the oven temperature.
Helpful Tips for Perfect No-Knead Bread
1. Give the Dough Enough Time
Don’t rush the first rise. The long resting period is what develops the flavour and airy texture.
2. Use a Hot Oven
A properly preheated oven is essential for good oven spring and a crisp crust.
3. Preheat the pot.
Putting the dough into a cold Dutch oven can produce a different texture and may reduce the initial rise.
4. Handle the Dough Gently
The bubbles created during fermentation contribute to the bread’s airy crumb. Avoid aggressively pressing them out.
5. Let It Cool
Allowing the bread to cool before slicing helps prevent a gummy interior.
6. Don’t Worry About Perfection
No-knead bread is supposed to have a rustic appearance. Uneven cracks, bubbles, and a naturally irregular shape are part of its charm.
Serving Suggestions
This homemade bread is incredibly versatile.
Serve warm slices with:
- Butter
- Olive oil and herbs
- Garlic butter
- Tomato and mozzarella
- Avocado
- Scrambled or fried eggs
- Soup
- Stews
- Pasta
- Roasted vegetables
- Salads
- Cheese and fruit
It also makes an excellent base for sandwiches, toast, bruschetta, and garlic bread.
For a simple breakfast, toast a thick slice and top it with avocado, tomato, black pepper, and a drizzle of olive oil.
Storage
Store the cooled loaf at room temperature in a bread bag, paper bag, or loosely covered container for approximately 2–3 days.
Avoid storing homemade bread in the refrigerator unless necessary because refrigeration can make bread stale more quickly.
For longer storage, freeze the bread.
Slice the loaf before freezing if you want to remove individual pieces as needed.
Wrap tightly and freeze for up to 2–3 months for best quality.
Nutritional Information
Approximate values per serving, based on 10 slices and the basic recipe.
- Calories: 150 kcal
- Protein: 4 g
- Carbohydrates: 31 g
- Fat: 1 g
- Fiber: 1 g
- Sugar: Less than 1 g
- Sodium: Approximately 350 mg
Nutritional values will vary depending on the flour brand, slice size, and optional ingredients used.
Benefits of Homemade Bread
1. Simple Ingredients
Making bread at home gives you control over the ingredients. This recipe uses basic pantry staples without requiring complicated additives.
2. No Kneading Required
Traditional bread recipes can require substantial kneading. This recipe relies on time and fermentation instead.
3. Customizable
You can experiment with whole wheat flour, herbs, seeds, garlic, cheese, or other additions.
4. Fresh Flavor
Freshly baked bread has a flavour and aroma that is difficult to match with packaged bread.
5. Budget-Friendly
Flour, yeast, salt, and water are inexpensive ingredients, making homemade bread an economical baking project.
6. Satisfying to Make
There is something incredibly rewarding about turning a few simple ingredients into a beautiful golden loaf.
Recipe Variations
Garlic Herb Bread
Add 1 teaspoon dried Italian seasoning and 1 teaspoon garlic powder to the dough. You can also fold in fresh rosemary or parsley.
Rosemary Olive Oil Bread
Add 1 tablespoon chopped fresh rosemary and 1 tablespoon olive oil to the dough.
Whole Wheat Version
Replace up to 1 cup of the all-purpose flour with whole wheat flour. You may need a little additional water because whole wheat flour absorbs more liquid.
Cheesy Bread
Add shredded Parmesan or cheddar to the dough before the first rise. Avoid adding excessive cheese because it can affect the dough’s structure.
Seeded Bread
Add sunflower seeds, pumpkin seeds, sesame seeds, or flaxseeds for extra texture.
Frequently Asked Questions
Can I make this bread without a Dutch oven?
Yes. A Dutch oven provides the best steam environment, but you can bake the loaf on a preheated baking sheet or pizza stone. Adding a heatproof pan of boiling water to the oven can help create steam.
Why is my dough so sticky?
No-knead bread dough is naturally wetter and stickier than traditional bread dough. Lightly flour your hands and work surface rather than adding large amounts of flour.
Can I let the dough rise longer than 18 hours?
Depending on room temperature and yeast quantity, the dough can sometimes tolerate a longer fermentation, but over-fermentation can cause it to lose structure. If you need to delay baking, refrigerating the dough is generally a better option.
Can I use whole wheat flour?
Yes. For best results, start by replacing about one-quarter to one-third of the all-purpose flour with whole wheat flour.
Why didn’t my bread rise?
Possible reasons include inactive yeast, water that was too hot or cold, insufficient rising time, or a particularly cool room.
How do I know when the bread is done?
The crust should be deeply golden brown, and the loaf should sound hollow when tapped. If using an instant-read thermometer, the centre should generally be around 200–210°F (93–99°C).
Can I add toppings?
Absolutely. Before baking, you can brush the surface lightly with water and sprinkle it with sesame seeds, oats, or other toppings.
Can I make the dough ahead?
Yes. The dough can be prepared the night before and allowed to ferment overnight. This is one of the easiest ways to incorporate homemade bread into a busy schedule.
Why does my bread have a thick crust?
A very dark or thick crust can result from an oven that runs hot or from baking uncovered for too long. Reduce the uncovered baking time slightly if necessary.
Why is the centre gummy?
The bread may have been underbaked or sliced before it had cooled sufficiently. Make sure the loaf is thoroughly baked and allow it to cool before cutting.
Final Thoughts
This Easy No-Knead Crusty Homemade Bread proves that making beautiful homemade bread doesn’t have to be complicated.
There is no kneading, no stand mixer, and no advanced baking technique required. Simply mix the ingredients, give the dough plenty of time to develop flavour, shape it gently, and bake it in a hot covered pot.
The result is a rustic loaf with a crispy golden crust, soft fluffy centre, and delicious homemade flavour.
Once you’ve made it successfully, you can start experimenting with garlic, rosemary, cheese, seeds, whole wheat flour, or other favourite additions.
Whether you’re serving it alongside a comforting bowl of soup, turning it into toast for breakfast, or simply spreading it with butter while it’s still warm, this is the kind of recipe you’ll want to keep coming back to.