
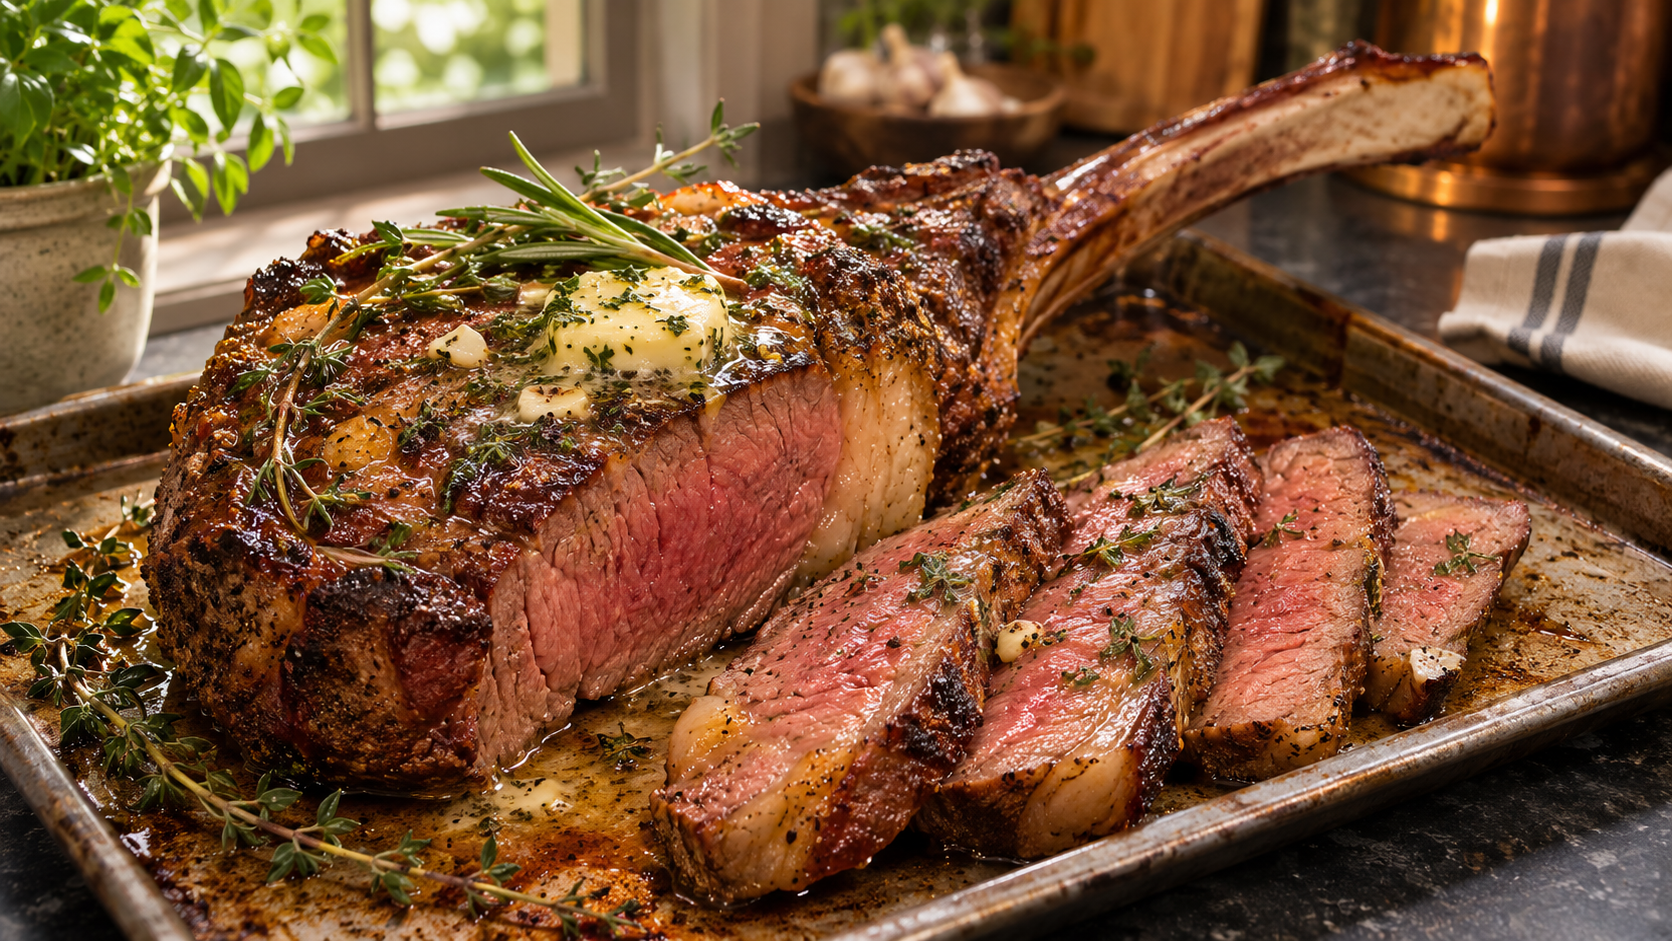
Reverse-Seared Tomahawk Ribeye Steak with Garlic Herb Butter
Description
Reverse-Seared Tomahawk Ribeye Steak is an impressive dinner featuring a deeply browned crust, tender beef, and fragrant garlic herb butter. Its long rib bone creates a beautiful presentation, while the generous marbling gives the meat its rich flavor.
Inspired by your photo, this recipe starts with gentle oven cooking and finishes with a quick, hot sear. This method works particularly well for thick steaks because it gives the center time to warm evenly before the outside develops its crust.
Butter, crushed garlic, rosemary, and thyme provide the finishing touch. As the butter melts around the steak, it picks up the herbs’ aroma and creates delicious juices to spoon over the sliced beef.
Despite its restaurant-style appearance, this recipe uses a short ingredient list. A thermometer, a sturdy cooking surface, and careful temperature control are the main tools for success.
Recipe Information
- Prep Time: 15 minutes
- Optional Dry-Brining Time: 8–24 hours
- Cook Time: Approximately 50–85 minutes
- Resting Time: 5–10 minutes
- Total Time: Approximately 1 hour 10 minutes to 1 hour 50 minutes, excluding dry-brining
- Servings: 4
- Cooking Method: Oven roasting followed by pan-searing
- Oven Temperature: 250°F / 120°C conventional
Ingredients
- 1 tomahawk ribeye steak, approximately 2½–3 pounds and about 2 inches thick
- 2 teaspoons kosher salt, adjusted for salt brand and taste
- 1 teaspoon coarsely ground black pepper
- 1 tablespoon avocado oil or another high-heat cooking oil
- 3 tablespoons unsalted butter
- 4 garlic cloves, lightly crushed
- 2 fresh rosemary sprigs
- 3 fresh thyme sprigs
Salt note: Fine table salt is denser than many kosher salts. If using table salt, start with approximately 1 teaspoon.
Step-by-Step Instructions
🥩 1. Prepare the Steak
Remove the steak from its packaging and pat it thoroughly dry with paper towels. Dry both broad sides, the fatty edges, and the meat close to the bone.
Check for any loose bone fragments and wipe them away before drying again. Trim only unusually thick, hard pieces of exterior fat. Leave the marbling inside the meat.
A dry exterior helps the steak brown quickly during the final sear. This matters because the center will already be mostly cooked by that stage.
🧂 2. Season or Dry-Brine
Sprinkle the salt evenly over both sides and around the edges. Place the steak on a wire rack set inside a rimmed baking sheet.
For deeper seasoning, refrigerate uncovered for 8–24 hours. This optional dry-brining step also helps dry the surface.
If cooking the same day, season while preparing the oven. There is no need to leave a thick steak on the counter for hours.
Add the black pepper before roasting, pressing it gently onto the surface.
♨️ 3. Preheat the Oven
Heat the oven to 250°F / 120°C and position a rack near the center.
Keep the steak elevated on the wire rack so warm air can circulate underneath. Make sure the baking sheet supports the entire steak securely.
Insert an oven-safe thermometer probe horizontally into the thickest central portion of the meat. Avoid touching the bone or placing the tip inside a large seam of fat.
If using an instant-read thermometer, begin checking early during roasting.
⏲️ 4. Roast Gently
Place the steak in the oven and cook for approximately 45–75 minutes. Begin checking the internal temperature around 35–40 minutes.
Thickness, starting temperature, and oven performance all affect timing. A particularly thick steak may take longer.
For this recipe’s final cooking target, remove the steak from the oven when the center reaches approximately 130–135°F / 54–57°C. The searing stage will raise the temperature further.
The surface should look dry and lightly browned. A dark crust is not expected yet.
🔥 5. Prepare the Searing Surface
As the steak approaches its oven target, heat a large cast-iron skillet or flat griddle over high heat.
Check that the long bone will not prevent the meat from lying flat. A griddle or grill is often more convenient for an oversized tomahawk.
Add the oil just before cooking. It should shimmer, but avoid leaving it smoking heavily.
Keep tongs, butter, garlic, herbs, and a warm serving platter close by. The final cooking stage moves quickly.
🍳 6. Sear Both Sides
Carefully place the steak on the hot cooking surface. Sear for approximately 60–90 seconds on the first side, then turn and repeat.
Look for an even, deep brown crust. Avoid deliberately burning the surface to achieve a darker appearance.
Press lightly with tongs if needed to improve contact, without squeezing the meat. Check the internal temperature between turns, particularly if the steak started the sear near the upper end of the oven target.
🔄 7. Brown the Edges
Hold the steak securely with sturdy tongs and briefly sear the fatty edge for approximately 30–60 seconds.
Brown other exposed edges where practical. This adds flavor and helps soften some exterior fat.
The steak may be heavy, so support it with a second utensil if necessary. Keep your hands clear of splattering oil.
If the crust is ready before the center reaches its final temperature, finish gently in the low oven rather than continuing an aggressive sear.
🧈 8. Baste with Garlic Herb Butter
Reduce the heat to medium-low and allow the skillet to cool briefly. Add the butter, crushed garlic, rosemary, and thyme.
When the butter melts and foams gently, tilt the pan carefully and spoon it over the steak for approximately 30–60 seconds.
The garlic should become fragrant and lightly golden. Remove the pan from the heat if the butter or herbs start blackening.
For food safety, cook whole beef steaks to 145°F / 63°C before removing from the heat, followed by at least a 3-minute rest.
⏳ 9. Rest Before Carving
Transfer the steak to a warm platter or cutting board with a channel for collecting juices.
Spoon over a little unburnt garlic butter. Rest for 5–10 minutes, leaving uncovered or covering very loosely with foil.
Avoid wrapping tightly, which traps steam and softens the crust. Resting also gives you time to finish plating your side dishes.
Use a clean board and clean utensils for carving the cooked steak.
🔪 10. Slice and Serve
Run a sharp knife along the rib bone to separate the meat. Place the bone beside the steak for presentation.
Identify the direction of the muscle fibers and slice across them into thick strips. Different sections of a ribeye may have slightly different grain directions.
Arrange the slices on a warm platter and spoon over the remaining garlic butter and collected juices.
Divide into four portions and serve promptly while the meat is warm and the crust retains its texture.
Helpful Cooking Tips
- Choose a thick steak: Reverse-searing is especially useful for steaks around 2 inches thick.
- Trust the thermometer: Cooking time alone cannot reliably indicate doneness.
- Keep the surface dry: Blot away any visible moisture before searing.
- Check pan fit beforehand: The bone should not lift the meat away from the hot surface.
- Add butter late: Butter burns more easily than the oil used for the initial sear.
- Avoid overcrowding: Cook multiple steaks separately unless your cooking surface has ample room.
- Prepare sides first: Have them nearly ready before starting the final sear.
Recipe Notes
Choosing Your Steak
Look for reasonably even thickness and fine streaks of fat throughout the meat. Marbling contributes richness, but a very thick exterior fat layer does not guarantee tenderness.
The listed purchase weight includes the bone. Actual edible yield varies, so serving sizes depend on the individual steak and how much fat is trimmed.
Suitable Substitutions
A thick cowboy steak or bone-in ribeye works well with the same method. Adjust cooking time according to thickness and temperature.
You can use only rosemary or only thyme if preferred. Crushed garlic cloves are easier to manage during basting than finely minced garlic, which burns quickly.
Grilling Option
After oven roasting, sear over a thoroughly preheated grill. Turn as needed to develop a crust without prolonged flare-ups.
Prepare the garlic herb butter separately in a small saucepan and spoon it over the steak after grilling.
Serving Suggestions
Roasted baby potatoes, creamy mashed potatoes, or a baked potato pair well with the buttery beef.
For vegetables, try asparagus, green beans, roasted broccoli, or sautéed mushrooms. A crisp green salad with lemon dressing adds freshness.
Because ribeye is rich, simple sides often work best. Serve extra sauces sparingly so the beef and garlic herb butter remain the main flavors.
Estimated Nutritional Information
Per serving, based on four servings:
- Calories: Approximately 600–750
- Protein: Approximately 40–50 g
- Total Fat: Approximately 48–62 g
- Saturated Fat: Approximately 21–28 g
- Carbohydrates: Approximately 1–2 g
- Fiber: Less than 1 g
- Sugar: Less than 1 g
- Sodium: Approximately 500–1,000 mg
These are broad estimates because bone weight, marbling, salt brand, trimmed fat, and consumed butter vary considerably. Side dishes are excluded.
Nutrition Benefits
Provides protein: Beef supplies protein needed for normal muscle maintenance and tissue repair.
Contains iron: Beef provides heme iron, which the body absorbs readily and uses for normal oxygen transport.
Supplies vitamin B12 and zinc: These nutrients support normal blood cell formation, nerve function, and immune function.
Contains few carbohydrates: The steak and herb butter contribute very little carbohydrate.
Ribeye and butter also contain substantial saturated fat. Moderate portions, trimmed exterior fat, and vegetable sides help balance the meal.
Questions & Answers
Why use the reverse-sear method?
Gentle oven cooking gives you better control over a thick steak’s interior. The hot final sear then develops the browned crust without requiring a long period over intense heat.
Can I skip overnight dry-brining?
Yes. Seasoning shortly before roasting still produces a flavorful steak. Overnight dry-brining mainly improves seasoning distribution and surface dryness.
Why is the outside browned but the center below target?
The searing surface may have been very hot, or the steak may be unusually thick. Return it to the low oven and check regularly rather than burning the crust.
How should I store and reheat leftovers?
Refrigerate within two hours in a covered container and use within 3–4 days. Reheat gently with a little broth until leftovers reach 165°F / 74°C. Slice only what you need to help the remaining meat retain moisture.